Using AWS Lambda and Cloudfront to retain SEO juice (using URL redirects)
Don't hurt or destroy your page ranking when you switch blog/help documentation providers. Retain your SEO juice by redirecting people to your new pages

If you change blog providers or are transferring help doc services, URLs to resources are likely to change. Redirecting is not only important so that you can retain SEO juice, you also want to ensure your customers can find what they’re looking for (no one likes getting a 404 page).

In this guide, I’ll first take you through creating an AWS Lambda function for URL redirection and then walk you through configuring Cloudfront to utilize this function.
First, a little background though…
Why AWS Lambda?
While Cloudfront allows you to set up some basic redirection, there’s no way to modify the URL path (i.e. test.com/blog/my-awesome-post needs to change to blog.test.com/my-awesome-post) . With Cloudfront, you would be able to redirect test.com/blog to blog.test.com/blog but you wouldn’t be able to strip the extraneous /blog. We need to bring in AWS Lambda so that we can write a serverless function that does this URL manipulation for us.
What is AWS Lambda?
AWS Lambda lets you run code without provisioning or managing servers. You pay only for the compute time you consume — there is no charge when your code is not running. With Lambda, you can run code for virtually any type of application or backend service — all with zero administration. Just upload your code and Lambda takes care of everything required to run and scale your code with high availability. -AWS
With AWS Lambda, we can write a function that will handle all of our URL redirects and have that function be triggered by the Viewer Request event in Cloudfront.
Let’s get started!
URL Redirection Lambda function
The first step we’re going to take is writing the actual function that will handle the URL redirection. Here’s how:
- Start here
- Click ‘Create function’
- Click ‘Author from scratch’
- On the next page you’ll be asked to configure triggers, you can skip this for now and press ‘Next’
- Name your function and choose a runtime (I’ll be using Node.js 6.10 in this guide)
6. Code your function (below is some code that should get you 99% there)
'use strict';

exports.handler = (event, context, callback) => {
  /*
   * Generate HTTP redirect response with 301 status code and Location header.
   */

   const request = event.Records[0].cf.request;

   // get the original URL path
   const path = request.uri
   const baseURI = 'https://new.test.com'

// construct the response
   const response = {
      status: '301',
      statusDescription: 'Found',
      headers: {
          location: [{
              key: 'Location',
              value: baseURI,
          }],
      },
  };

// Configure the URL redirects
  switch(path) {
    case '/path/to/old/resource':
      response.headers.location[0].value = baseURI + '/path/to/new/resource';
    break;
    case '/rinse/and/repeat':
      response.headers.location[0].value = baseURI + '/path/to/new/resource';
    break;
    default:
      response.headers.location[0].value = baseURI;
   }

  callback(null, response);
};
7. For Role, choose ‘Create a new role from template(s)’ , name the role, and add ‘Basic Edge Lambda permission’ from the Policy templates
8. Important: After creating this role, go here, go to Roles, click the role you just created, go to Trust relationships, and Edit trust relationship.
9. Make sure your Trust document looks like the following and Save:
{
  "Version": "2012-10-17",
  "Statement": [
    {
      "Effect": "Allow",
      "Principal": {
        "Service": [
          "edgelambda.amazonaws.com",
          "lambda.amazonaws.com"
        ]
      },
      "Action": "sts:AssumeRole"
    }
  ]
}
11. Go back to the Lambda function you were creating
10.Click Next and copy the ARN number for this function (in upper right hand corner)
Cloudfront configuration
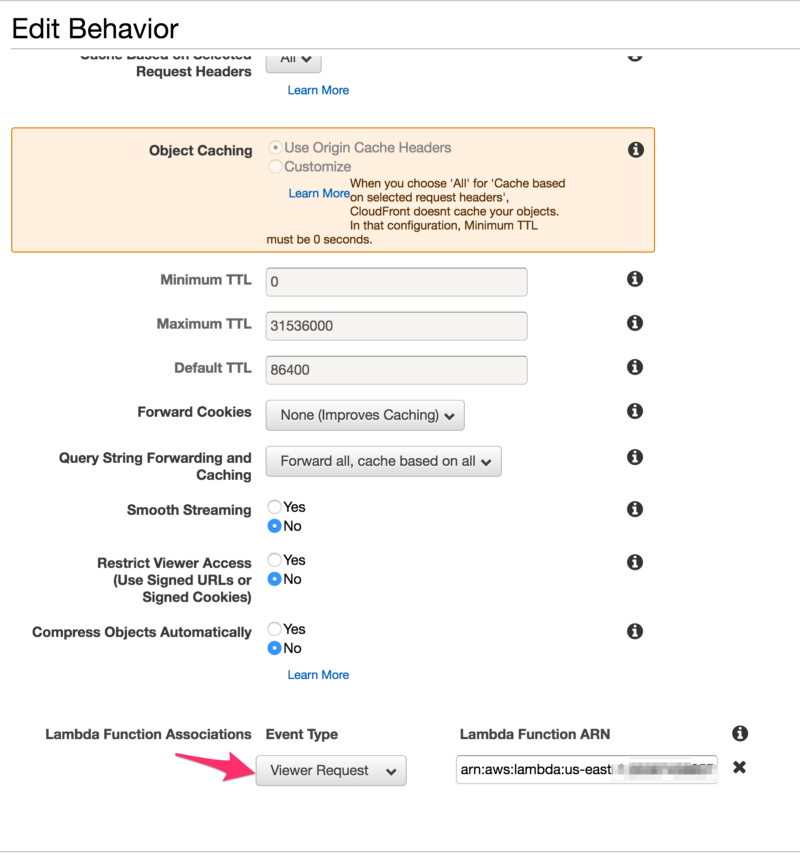
Now that we have our Lambda function set up, we need to make sure it is triggered in Cloudfront. To do this, you need to either create a new behavior or edit an existing one.
Once, you have the behavior, you’ll want to create a Lambda Function Association for it with an Event Type of Viewer Request. The ARN should be the ARN you copied in the previous sections step 9.
Once you hit save and the changes deploy (~20 min), your Cloudfront distribution will now properly redirect customers to your resources!